Showing posts with label Terribly Obscure Battles. Show all posts

Saturday, May 26, 2012

Terribly Obsure (E) Rebellion: The Eureka Stockade.

Whilst Australians may wonder why this Rebellion features in a Terribly Obscure I am fairly sure it fits the bill, especially with mt Pom followers ;-)
1851 saw the discovery of gold and with it an influx of migrants other than the usual agricultural workers. A great strain was put on all professions as many left their normal jobs and went to seek their fortune seeking gold. The Governments answer to this was to create expensive licences that had to be renued every month at a cost of 30 shillings no matter how successful the miner had been the previous month. The idea was that the shear cost would deter some and many others would go back to their professions as they failed to make ends meet. Not only was these licence's unpopular but the method of enforcement was heavy handed. The problem was that the established Police Force was far too few in number so a hasty and large expansion was required. Not a small amount of irony found a ready source of recruits being ex-convicts and their previous guards. This quickly led to corruption as the Police were open to bribes and even the honest ones just had so much work related to the miners (checking all licences twice a week!) so normal police duties suffered and with it a rise in crime both inside the camps and also in the area around them.
This only led to angering the miners who felt the licences were excessively expensive and saw little return in both mining profits and social decency. The greater the resistance and anger to the licence and police corruption the greater the Police brutality. The spiral just fed itself until it came to a head in the Eureka Lead at Ballarat where a man accused of the murder of a Digger (miner) escaped justice due to being a friend of the police. A group of Diggers burnt down Bentley's Hotel where the murder took place and three of them were arrested for arson. When the demand for their release was refused the miners along with other demands the diggers had two choices. Back down or make a stand! The murder of the digger had had acted as a rallying call and the main grievances were brought to the fore. Voting for all miners (at this point you had to have mined for 6 months in one location to vote), the removal of the hated licence and reduction of corruption within the police. The Governor refused to release the men and 18 days later on the 29th November 1854 a second mass meeting was held and this was the first display of the Eureka Flag, a dangerous development.

The five stars represent the Southern Cross.
The meeting broke up after the burning of Licences and the election of leaders. The following day further licences were burnt and the diggers now numbered over 1000 men and they built a wooden stockade made of stakes. They swore an oath of allegiance assuring the Governor could neither ignore or tolerate the miners actions. In the mean time extra troops had been dispatched to help contain the miners and by the 3rd of December enough troops were in place to take action (around 700). Meanwhile many of the miners had slipped away from the stockade knowing they stood no chance against well armed professional troops whilst having few arms themselves. Early on the 3rd the troops moved against the stockade. Despite the low numbers of arms and now numbering less than 200 strong the diggers still tried to make a stand. Organised resistance lasted but about twenty minutes before the troops defeated the miners leaving around 50 dead to a cost of three of their own.

Breaching the Defences.
13 of the leaders of the uprising were charged with treason and many others had been wounded in the action and following sweep through the diggers camp and whilst they faced hanging for the charge of treason they were all acquitted instead. As often is the case when unreasonable events lead to such activities the central government after an investigation found the miners demands were just and whilst the licences were not revoked, the cost of them were reduced to an 8th. Voting was allowed for all miners no matter how long they had worked the area and the Gold Commissioners (who were hated for their corruption and heavy handed manner) were replaced by a system of wardens.

Wargaming the Rebellion.
Obviously any wargame of the stockade action is going to be short and not exactly inspiring, as such most of the gaming this can provide is almost of the roleplaying level. Actions between Police and the Bushwhackers or travellers and bushwhackers (bandits in the bush) or fictitious small engagements between the police and diggers where both sides have limited arms.

Thursday, May 17, 2012

Terribly Obscure part 4 (D) Danish-Estonian War of 1219-27

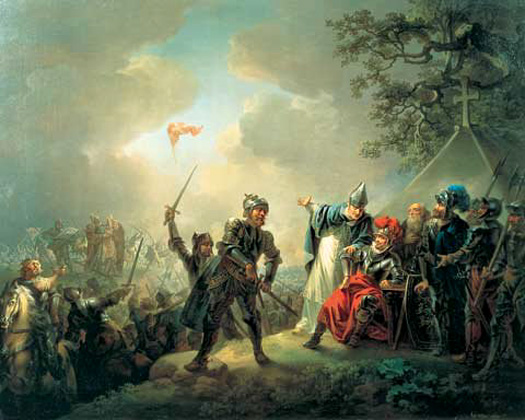
Livonia was an area that was essentially the whole of Estonia and part of Latvia. Tensions and then all out war was created with the Christianising of the south of the area. The Danes became involved when their King, Valdemar II launched a Crusade with the support of the Christian Livonian Knights of the Sword and the bishop of Riga.  This crusade was against the Estonians under Russia's Greek Christian influence and originally took the Estonians by surprise by landing a large force at Lyndanise (the name of this as then trading town has since been called Reval and now Tallinn) A battle was fought here on the 15th June 1219 in which the Danes were originally losing but legend has it that a red flag with a white cross fell from the sky giving them fresh hope and they went on to win the battle. The Danish National flag is the oldest in the world as from this date they took this up as their national standard.


The Estonians were originally outnumbered and sued for peace but secretly reinforced their forces and through a five pronged attack drove back the Danes but they in turn were reinforced with German troops and Waldemar and defeated the Estonian-Russian forces before the end of 1219. The trading town of Lyndanise was again captured but burnt to the ground to be replaced by a fortress and later to become a city. The garrisons job was not just to enforce Danish rule but also to enforce conversion to Christianity of the Danish style.

Danish sovereignty in Estonia was lost when German troops fought against Valdemar at the Battle of Bornhoved (22nd July 1227) and was so hard pressed by both sides that it was said that they fought up to their knees in blood.

Battle of Bornhoved in the traditional depiction.
Control was finally regained in 1238 through agreement with the Livonian Knights (Brothers of the sword) with whom it all started.

Sunday, May 6, 2012

Terribly Obscure Battles, Wars and Revolts 3 (C)

The Chaco War (1932-35).
Not so terribly obscure a war as the previous two but rather more obscure than it deserves. This was South America's largest war and whilst Osprey has released a book on the war it remains one of the more neglected wargame subjects that is very much possible to play. The Spanish Civil War gets all the attention though both wars have some parallels. Firstly both lasted about three years and secondly (and for the SCW fan importantly) both used a lot of European equipment. Not only did they use the surplus WWI equipment such as old planes and MG's but they also used modern equipment very much as was later used in the SCW so if you already play this period you have some flexibility.

The Disputed Area.
Gran Chaco was an area that could well be described as an a place God had forgotten. It's fair to say that both Bolivia and Paraguay had also forgotten about it as well! A nasty mix of jungle and scrub desert with daytime temperatures rising to over 40 degrees C but can fall below freezing at night. Dust ridden in the Summer and a sea of mud between December and March. The only fertile parts being along the two rivers within the area. Gran Chaco was in parts owned by Bolivia and Paraguay as well as Argentina but none of the three paid attention to this almost uninhabitable wasteland. So what was it that brought the former two to such a bitter three year conflict? Oil. The area was thought to be rich in oil reserves, this was to prove inaccurate but before this was discovered 400,000 troops had been drawn into the conflict with 90,000 killed and a waste of an equivalent of US$500 million.

Paraguayan Troops Enter The Chaco to protect their settlers.
Paraguay had the unenviable distinction of being the first League of Nations member to declare war on another member state. Ironic as the League was brought into being to ensure the future would hold no more wars! Though this is jumping forward in the tail as 11 months of unofficial war and discussion predate the declaration (10th May 1933). The conflict supply a ready mix of battles for the enterprising wargamer from skirmish battles such as the Paraguayan capture of a Bolivian post on the 16th of July 1932, starting the armed conflict  through to pitched battles of 1933 and 1934 to the Trench warfare that ended the war. Sieges, air battles, tanks and river boat actions all have a place in the war making it the surprise missing guest at the wargames table.

Paraguay had the best of the first months of the war as both countries had fairly small armies deployed at the start of the conflict ( a form of National Service meant a large pool of trained and semi-trained troops could be brought into service). But the Larger, better equipped and trained Bolivians were soon retaking lost positions and forcing the Paraguayan troops back. Paraguay had ordered full mobilisation whilst Bolivia only a partial as they expected an easy victory. By the end of 1934 Paraguay held most of the Chaco and even managed to invade Bolivia itself in 1935 before being pushed back. This was the high water mark for the Paraguayan forces but Bolivia was never able to use it's strength effectively enough to win the war. 1935 saw the war take on a static nature and the cost in men and material had left both countries with little left to conduct an operation that would bring about the others defeat and as such after many attempt to solve the war Diplomatically through the years of conflict first a truce then finally a Peace Treaty with Paraguay retaining most of the Chaco whilst Bolivia given access to the Atlantic via Paraguay and Parana rivers plus the use of Puerto Casado as a free port. So a lot of blood spilt for no real gain for Paraguay though Bolivia gained trade advantages it was at a shocking cost.

Ju52 in Bolivian Service
If you are interested in wargaming the period I can not recommend The Green Hell by Adrian J. English as a great place to start. Not only does the book cover the whole war but has descriptions of the actions and best of all for the wargamer supplies lists of equipment and Regiments allowing the gamer to reproduce accurate units on the battlefield.

Monday, April 30, 2012

Terribly Obscure Battles, Wars And Revolutions 2 (B)

Burmese-Chinese War of 1765-69


Burma under the reign of King Hsinbyushin followed an aggressive expansionist policy. Having recently invaded Siam and even capturing their capital in 1767 (but failing to bring them to peace) Hsinbyushin then started to raid the Chinese boarder. China's Emperor Ch'ien Lung launched a major invasion into Burma. This caught the Burmese somewhat by surprise as the vast majority of their troops were fighting in Siam. Fortunately for Hsinbyushin the Chinese expecting a rather easy campaign had committed mostly untrained troops to the invasion and the greatly outnumbered but superior Burmese defeated the invaders. The second invasion was no more successful as more troops were committed by both sides to a slowly expanding conflict.
By the time of the third invasion the boarder conflict had become a full scale war as more and more Burmese troops were taken from the Siam front and thrown into defence against the massed Chinese armies.

Elite Manchu Bannermen


The third invasion (1767-68) was the most successful as it used the Elite Manchu Bannermen as the main part of the invading fore. China being so much larger than Burma had the forces to keep up the pressure on the Burmese and could replace lost troops far faster than the defenders and after winning a series of battles and smaller engagements were within a few days march of the capital (Ava). This was as close as they were to get. Each battle had cost the Bannermen high in casualties. The jungle was not neutral, many more soldiers were to die from disease or starvation as supply lines were cut by smaller Burmese units operating to flank and rear of the Chinese battling forwards. Momentum was lost and the remains of the army staggered back to china. King Hsinbyushin well aware of how close a call it was stripped Siam of most of his remaining troops and reinforced his border posts.

The fourth and final invasion was also the largest as Ch'ien Lung determined to bring the war to an end in his favour was bent on battering his way into victory. The invasion soon bogged down and the more mobile Burmese forces soon had the Qing forces surrounded and a truce was organised between the opposing commanders in December 1769.

Both sides kept an heavy presence on the boarder for about ten years but no more attacks were made by either side. China also held a trad embargo for 20 years with Burma but in 1790 Diplomatic relations were reinstated. China claiming this as a victory against Burma. Estimates of Chinese losses vary greatly between 20,000 and 70,000. What can not be disputed is that some of the cream of China's army was lost in the third invasion. Siam was the real winner, with the main war effort shifting from there to China they were able to claw back the lost territory and settle on good terms. Another example of fighting wars on two fronts just not being effective.

Friday, April 27, 2012

Terribly Obscure Battles, Wars and Revolutions A-Z (and back again?)

OK a new series to go along with the ECW history stuff. I will try and pick out battles and wars that may not be mainstream and give a bit of detail of them. It's not meant to be in depth or long, just a bit of an interest read for you.

Typical troops of the period.

Abbasid Revolution of A.D.747-50
Northeastern Persia was controlled by the Ummayyad family but the Abbasid's who claimed to be descendants of Addas, Uncle of The Prophet Muhammad and led by Abu Muslim (they were Muslim Arabs) openly revolted in 747 and seized the strategically important City of Merv that sat on the silk roads. Marwan II the last Ummayyad caliph tried to smash the rebellion but suffered defeats at the battles of Nishapur, Jurjan, Nehawand and Kerbela. Up to this point the rebellion was contained in the province of Khorasan but with these defeats the revolt spread across other provinces in the Muslim empire. A further and decisive battle was fought at the Great Zab River in 750 which ended the revolt in the Abbasid's favour with Abu al-Abbas as-Saffan proclaiming himself  the first Abbasid caliph at Kufa, a Mesopotamian city near the Euphrates River. As for Marwan he fled to Egypt but was soon murdered.