Monday, August 31, 2009

Tool Time Tuesday...You "Can" Do It

Tool Time Tuesdays started out with tools and gadgets that I would find another use for. Seems I've gone from the hardware store to the grocery store...more like the recycling bin. This project uses up all the metal cans in your garbage. You can uses big coffee cans, veggie cans or cans from crushed tomatoes...anything will work.
space
Most cans now seem to have a smooth edge after you open them, but just check for sharp spots before you start.


Just a few tools for this project: Drill (or screw driver), hammer, awl and metal screws. The screws have a point on the tip and mine are about 3/4" long.


Now that I'm looking at this next picture after it was posted, it sure does look weird. You're probably saying what the heck is she doing with this combo of chains and leather belts. They are actually the choice of handles you can choose. If you pick the store bought handle, pictured on the bottom left, make sure it is not a cabinet handle. It has to be a handle that can be screwed in from the top, not from the back like the ones on a kitchen cabinet...see the little holes on the ends.


This tutorial is more of a description rather than exact measurements for things. You will pick the can size and how many cans you will need for your carrier. You can just uses 4 cans, 2 on each side. I actually made my can carrier 15 years ago for my husband. He used it first for all his desk supplies in his office. There was very little drawer space in his desk, so he needed to keep it all on a shelf. He has also used it for tools. It was first painted navy blue, but I spray painted it all black for this project.
space
So for this project, you will need a piece of wood to attach the cans to. I picked a 2"x4" piece of wood that is long enough for 4 coffee cans on each side of the board. You can make your carrier any size. Spray your cans and the wood to your desired color.


Take the point of the awl and your hammer and tap a hole at the same spot on all the cans, probably 1/4" - 1/2" down from the top. It's best to do the hammering on a scrap piece of wood or outside on the driveway. In this picture, it looks like I was doing it on the wood floor!!


Here is a close up of the hole.


Evenly space your number of cans on the piece of wood and screw into place. Because of the size in the can, you might have to drill the screws in on an angle.


Here are all 8 of my cans screwed into the wood block.


Now for the handles. Remember, I made this one 15 years ago, so I am using the same screw holes just as an example for the handles. This one is a piece of chain. If I were to use chain, I would spread it out a little wider, I just didn't want to make new holes.


This handle example is an old black leather belt. Really cute with the black cans and the galvanized look of the buckle. You would just cut the belt to desired length and screw right through the leather.


Here is my original handle which I am sticking with.


Now onto a few ideas for what to put in your Can Carrier:
  • arts and craft supplies
  • office supplies


Ideas for you or your daughters:
  • hair supplies
  • make-up
  • manicure and pedicure supplies


In the kitchen:
  • utensils
  • silverware
  • condiments for picnics or BBQ


You can also use it as a decorative item. Fill with plants for a center piece for a rustic look. Aren't these plants cute? They are from Ikea for $3.00. Really cute when it's all filled up!! You can also use fresh cut flowers or an herb garden.


Don't forget:
  • gardening tools
  • quilting supplies
  • tools
  • artist's paint supplies

Thanks for always stopping by and leaving such nice comments. I so appreciate each and everyone.

Have a great Tuesday,

~Karen~

EL CAPO UN FIASCO


Me di a la tarea de estar pegado al televisor esta semana para ver el inicio de la nueva telenovela del canal RCN,El Capo.

Tal vez me equiboque pero lo que vi no supero las expectativas que tenia con respecto a esta nueva produccion,que parecia ser una super produccion.

Esta primera semana de la produccion no fue lo que esperaba ya que me vendieron en las propagandas una cosa totalmente diferente. Los actores no conocen la manera de hablar de los paisas,la manera de expresion esta fuera de todo contesto pues es increible que en las escenas de forcegeo los actores se esten" tutiando" como si estubieran jugando a la "yeva".

Ojala que con el paso de los dias la produccion de todo lo que ofrecio en su lanzamiento por que sino este sera otro fracaso de RCN como en produccionesa anteriores.

MARCELA KLOOSTERBOER EN MISSPENDEJADAS

Estas son algunas de las mejores fotos de esta hermosa modelo y actriz argentina,Marcela Kloosterboer de 27 años de edad a conquistado al publico con su gran talento y belleza .


Aqui como es costumbre le brindamos un homenaje ,y complacemos a todos los seguidores de esta hermosa y talentosa argentina.


Friday, August 28, 2009

Friends on Friday...

You all know the way I feel about blogging. Along with quilting, it has become a must do in my life. I love to share my ideas and to be inspired by all of you.
space
I have met 2 wonderful new friends who have inspired me with their work. They used the tutorials from my car caddy and the design wall and have created their own works of art.
space
These first few pictures are from Vikki from Sew Useful Designs. You must visit her blog...fantastic. She created this cup holder sewing caddy for her friend (one very lucky friend!!) Is this the cutest thing you've ever seen or what? The little "are we there yet" is a needle holder. The floss holder on the key chain...absolutely clever.


space
and look at the little snips.
space


She also sewed her a travel journal. Look closely at the fabric. Peace on Earth by 3 Sisters...to die for how it matches the theme. Vikki, you really should start selling these!!! Thanks, so much for letting me post these pictures.
space


Now onto to Zlaty's fabulous design wall. Zlaty is from Zlaty Sews and her blog is a must see. Pop over and see her tutorial on this wall. Look at how she conquered my fabric nightmare. She sewed four channels for the pipes and look how tight her fabric is...you can probably bounce a quarter off it. Not only do I love the wall, but look what's on it. Zlaty, that is going to be one beautiful quilt. Can't wait to see that finished.


This last picture is how Zlaty cut her pvc pipe. Now is that a Tool Time Tuesday or what. That is one serious cutter and I want one!!! Thanks so much Zlaty for letting me share these pictures, I really appreciate it.


Thanks to both of you...
space
Have a great weekend,
~Karen~

Tool Time Tuesday...Recycled Ice Cream Container

Here is this week's final installment of Tasty Tool Time. If you missed the earlier tutorials click here for the actual instructions. The process is the same for covering the base, the only difference is the top of this ice cream container is big and fluffy.
space
This is a mini...soooo cute and only $1.00 (I know if we figure that price out by weight or ounces, it's probably $500.00 for 2 quarts, but cute wins.) Not to mention...it has a spoon on the inside of the lid, so you can eat this on the run!!

space
I needed a circle of fabric for the top of the lid. Guess what I used for a template??? A coffee filter...I have a boat load remember. This is the 4 cup size filter. The one on the right is ironed out.
space

space
Here is the white piece of fabric I cut out and a little bit of stuffing.


This is the first time I've used this stuffing. I LOVE IT!!! I bought this bag new at a consignment shop for $3.00, so I don't actually know how much it costs in the store. It is little soft pellets of fluff, very soft and doesn't bunch or clump. It feels like down. I think if you click on the picture, you can read the label.


In this step, you just hand sew a quick gathering stitch about 1/4" for the edge. Gather it up a little, feel with desired amount of stuffing, pull tight and knot to tie it off. Here's the bottom.


Here's the top.


Glue your fabric to the bottom cup, just like the other larger version. I used spray glue here too.


Hot glue your little white puff to the top, add some ric rac or ribbon and I glued a red button on for a cherry. The rim of this cover was a gold color. Next time I might use a 1/4" ribbon instead of ric rac, so the gold doesn't show, but the ric rac is just so darn cute.


Isn't it tiny?


From here on is where you can use your imagination. I glued on red beads to look like jimmies or do you call them sprinkles.


Then I glued on teal ones for an extra color. You can keep going and going...so fun to decorate.


Now, for all the uses:
  • pin box (holds pins on the inside and pin cushion on the top.
  • a holder just for needles
  • a gift box for that little special present
  • a gift box if you are giving money as the present
  • party favor boxes for your little girl's birthday.
  • place card holders
The ideas are endless...
space

Hope you liked this tutorial too. I enjoyed this Tool Time a lot for obvious reasons (yummy)!! For next Tuesday, you'd better start eating plenty of canned goods or perking your coffee at home...and save the coffee cans.

See you next week,
~Karen~
space
p.s.
space
Remember if you have made anything from my tutorials, I would love to show everyone your creation. I started doing it a while back on "Friends on Friday". I have 2 for today which I will post right after this.

Thursday, August 27, 2009

BIOGRAFIA Y FOTOS DE ISABEL MADOW


Nombre
: Isabel Madow
Fecha de Nacimiento : 5 de Octubre de 1975
Lugar de Nacimiento : Ciudad de Mexico
Signo : Libra Sexo : Femenino
Profesion: Modelo


Isabel Madow desde muy pequeña era ya una belleza especial,a los 14 años comienza a hacer trabajos de modelaje publicitario.

Marcas de ropa femenina y lencería descubren en Isabel el prototipo para el mercado al que dirigen sus estrategias publicitarias y la contratan para sus anuncios visuales .

Como modelo Isabel Madow tuvo la oportunidad de compartir el escenario con personajes como Lorenzo Lamas en una campaña de una conocida firma de rones y con Salma Hayek con moda y cosméticos.

Desfiles, pasarelas y sesiones de fotografía representaron en sus inicios y hasta el 2000, el común denominador de sus actividades diarias.

Antes de incursionar de lleno en la televisión fue parte de proyectos artísticos con Luis de Llano, Antonio Berumen y Shanik Berman.


En 1997 participo en el festival Acapulco donde canto balada, pero al no ser aun un personaje conocido no hubo mayor trascendencia.

A partir de ese año, ha participado en los openings de los festivales Acapulco.

En el año 2000 Víctor Trujillo en ese entonces, parte del talento de CNI-canal 40, convoca a un casting de modelos femeninas para elegir solo a una para integrarse al elenco de su programa El Mañanero . Isabel fue unánimemente elegida.

Es así como nace el personaje de “La Secre de Brozo”, una mujer de gafas que no habla, pero que con su lenguaje corporal comunicaba todo, en pocas palabras la mujer perfecta que no habla y atiende los requerimientos de su jefe.

Posteriormente, Isabel deja el programa de Trujillo, para someterse a un tratamiento médico por causas de agotamiento y una descompensación física.

Fue invitada para debutar de lleno como actriz en la telenovela Velo de Novia de Juan Osorio, pero rechazó el proyecto sin explicar la causa.

En septiembre de 2003 participa durante dos semanas como inquilina de la casa del Gran Hermano junto a otras 13 celebridades.

Isabel Madow a posado para revistas como H Extremo,Playboy,Maxim publicaciones en las que a dejado ver toda su belleza.

Actualmente, Isabel se encuentra alejada del medio artístico, sin embargom se espera muy pronto su regreso.

ROBINSON DIAZ INFRAGANTI


El actor colombiano Robinson Diaz se vio obligado a cambiar de pareja en la obra de teatro Infraganti . Ahora estara acompañado de la hermosa actriz y modelo Renata Gonzales , quien remplasara a la tambien actriz Sara Corrales , quien por motivos ya conocidos no podia seguir al lado de Robinson.

Dicen las malas lenguas que la esposa de Robinson Diaz le puso como condicion al actor, el cambio de pareja en el escenario si queria continuar con la obra de teatro .

Robinson Diaz no tuvo otro remedio que aceptar ya que la obra es muy buena y ademas a tenido una gran aceptacion en el publico colombianao

,sabemos que
Renata es una gran actriz como ya lo a demostrado en la television,asi que la ausencia de Sara no se va a notar demasiado.

Wednesday, August 26, 2009

Tool Time Tuesday...Recycled Ice Cream Container

Here is the second part to this week's Tool Time. Half Baked is Kelsie's favorite ice cream flavor. It's chocolate and vanilla ice cream with gobs of fudge brownies and chocolate chip cookie dough. It didn't take her too long to get through this container, which is good for me (I'm on a container search). I like ice cream, but if I had to choose, I like salty things...hmmm. I see a Pringles container in my future. Onto the tutorial...
space
Let's turn this container into a little sewing center...


space
that is soooo cute!!!
space
space
First step: Measure the top edge of the container just under the rim. Add a little for over lap.
space


Measure the length from top to bottom. Add about 1/2" for turning under on the bottom edge.


I cut my piece 11" x 4".


Here is where you will glue the fabric on. I used the spray glue like I used for the donut box. The spray glue works fast. You have 15 seconds to place the fabric. I scrambled...you need to place it and then work the pleats out evenly towards the bottom. The cup tapers down at the bottom so there will be pleats, but it reminds me of cup cake papers (hint, hint for the next tutorial this week). I used a little hot glue to seal down the seams of the 2 ends.


I used hot glue for the rest of the project. Here, I turned down the bottom edge and glued it in place.
space


Finished bottom edge.


Finished container.


Now onto the cover. Trace the cover on thin cardboard, file folder or poster board.


Trim inside the circle.


In this picture, I trimmed too much. I re-cut another to the black rim, but forgot to take a picture.
space


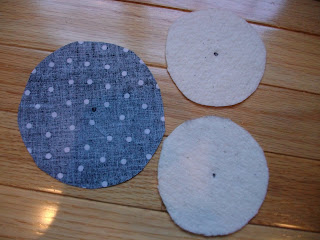
You will need fabric and batting. The picture shows 2 pieces of batting, but I suggest 3. I remade the cover, because I wanted it a little puffier. Your choice here.


Take the cardboard circle and eyeball the center.


Poke a hole with a pen (don't I sound so technical) These instructions would never pass the editor if I ever wrote a Tool Time book!!!


Trim the fabric to 1/2" to 1" larger then the cardboard circle.


Cut the batting the same size as the cardboard circle. Two are shown here, but I used 3.


Find the centers of all fabric parts.


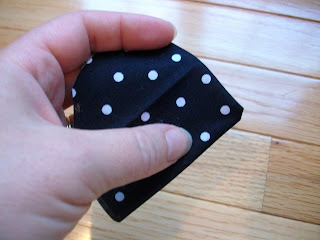
Fold into quarters and snip just a tiny little bit off the point. If you snip too much, you'll have a hole big enough to drive a truck through.


See...just a little snip.


No truck is getting through there.


Layer all the parts: Fabric, batting to the wrong side of fabric and the the cardboard.


Now hot glue down the edges. Start at one point, then do the other side opposite from that to keep the fabric even.


Then do the other sides.


Finish it off until it is neatly pleated.


Here is the top side.


Now we need to attach it to the cover. Take the cover and poke a small hole in the center.


Here you will need the knob that I showed you in the other TTT. Knobs are made for cabinet doors, so they have long screws to fit the thickness of the wood. You will need to switch out the screw to a shorter one and you also need 2 washers. Don't take the washers from here, because you need those to make circles.


The screws that are for knobs are machine screws, because the have a flat tip. This size fits my knob. You may need to bring your knob to the store to find one that fits or just raid some one's tool box!!


First, place one washer over the hole on the inside of the cover.


Then stick in the screw.


Place your fabric and batting circle on the top of the cover over the screw that has poked through. Now, place the second washer over the screw on top of the fabric.


Take your knob...


and twist it onto the screw.


Hot glue some ric rac on the edge of the cover and you are done.


Again, you can use this for anything...a gift box, goody package, but since we all sew, I like the fluffy top part for a pincushion and the inside for all my hand sewing items. This is the perfect size for my hexagons. If you match it to your decor, you can leave it beside your favorite chair and no one will know your sewing is in there.


Look for the next one probably Friday. I had to work an extra day this week and it's cutting into my creativity time!!!
space
See you soon,
~Karen~