Tuesday, June 30, 2009

Tool Time Tuesday...Spray Bottle Cover

Do you know that if you roam around the hardware store, you can find simple things you need and they are cheap! I love to iron with steam, so this spray bottle works great and it was only 96 cents. The only problem is...who wants to look at the store label. Below is a tutorial for a little cover. I know there must be dozens of ways to make a cover for these, but I just made this one up.


space
Isn't she cute?!! (minus the black thread I used for the tutorial)
space

All bottle sizes are different, so adjust to your bottle.
space
First, trace the bottom of the bottle onto fabric.


Trim with 1/4" seam allowance.


Measure how high you want the fabric to be on the neck of the bottle. I wanted mine to be about 7 1/2". Add 1/4" for the bottom seam allowance and 1" for the top. I also had a picture of the measurement around the bottle, but it's not here. I didn't want to add it, because I'm sure you all have had that experience when you add a picture later, it messes everything else up.
space
Well, any way... the measurements of my bottle were 7 1/2" high x 10 1/2" around. Add 1 1/4" to the height and 1/2" to the circumference.


My piece of fabric measured 8 3/4" x 11".


You will also need a piece of narrow ribbon about 20"-22" long with a safety pin to thread it through.


Take the rectangle piece of fabric with the long sides on the bottom. Fold over the short side, left to right. Mark down 1 1/4" from the top.


Sew with a 1/4" seam allowance from the mark down to the bottom.


At the top where it isn't sewn, fold over the 1/4" seam allowance.


Then fold over 1/4" on the top. I just pinned it so you can see without my finger being in the way.


Fold over again until it meets the original side seam. This will be the pocket where the ribbon will go through.


Sew close to edge. I used black thread so you can see the stitching.


Now for the bottom. Take the circle...


fold in half and iron.


The fold in half again and iron.


These creases will just help you center the circle inside the bottom tube.


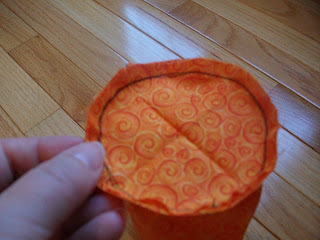
Take the body of the fabric and make a crease across from the seam.


Open it up and match the seam to that crease you just ironed and iron the other two creases. Yikes...does that make sense. You'll get it when you're actually doing it.


Set both sides with the iron.


If you open it up, you will see the creases that will match the four creases in the circle.


Match and pin.


Pin in between to secure all around.


Sew with a 1/4" seam allowance. I used my needle down feature and you may need to lift the presser foot as you are making your way around the circle.


Turn bag right side out and thread ribbon through pocket at the top.


and there you have it...a hardware store bottle made over into a cute little addition to your sewing room. (I really need to redo that black thread)


I usually do my TTT post late on Monday and they post a little after midnight on Tuesday, but I'm on vacation this week from work and we were gone all day yesterday with the kids. We are having a big party here on the 4th of July, so lots of project to finish up around the house. My theory is...if you want to finish up projects, have a party, because it forces you to get them done.
space
Have a great Tuesday. We finally have some sun here. I think it may be one of only a few days we've had in all of June.
space
~Karen~

Friday, June 26, 2009

MICHAEL JACKSON POR FIN EN PAZ

Este es un homenaje al hombre que puso a bailar a mas de una generacion con su musica,Michael Jackson es de esos personajes que nunca moriran pues han dejado un legado de por vida.

Nadie en el mundo podra decir que no sintio un vacio con la muerte de este gran artista,Michael Jackson movio al mundo al ritmo de su baile y su musica como solo los grandes lo han hecho.

Lamento en el alma el espectaculo que los medios han hecho de la muerte de Michael,pues en lugar de hablar de sus exitos lo unico que hacen es comentar sobre sus excentricidades,¿ acaso no es mayor su aporte a la musica que lo que el hizo de su vida privada?,ahi les dejo la pregunta.

Por el momento yo continuare disfrutando de todo el legado musical de Michael Jackson,y rogando que lo dejen descansar en Paz!!!!!!!!


DIOS BENDIGA AL REY DEL POP!!!!!!!!!!

ISABEL MADOW EN VIDEO

Este es un regalo para los seguidores de MISS PENDEJADAS, por la fidelidad que demuestran con sus visitas.

Thursday, June 25, 2009

BIOGRAFIA Y FOTOS DE ANA LA SALVIA


Nombre
: Ana La Salvia

Fecha de Nacimiento: 5 de diciembre
Lugar de Nacimiento: Caracas, Venezuela
Signo : Sagitario
Profesion: Actriz y Modelo
Sexo: Femenino


A la edad de 14 años, Ana comenzó su carrera de modelo, además de que incursionó en el campo del arte y estudió pintura al óleo, danza, piano clásico, canto y cuatro (instrumento musical con cuatro cuerdas).

Estudió por dos años Ingeniería en Sistemas, posteriormente inició una licenciatura en Administración y enseguida decidió estudiar Ingeniería Civil.

A pesar de sus múltiples ocupaciones, nunca abandonó las pasarelas.Meses más tarde realizó un comercial para una crema mexicana, y fue gracias a ese anuncio, que en 1997, realizó una audición para el CEFAC, y el 14 de marzo de 1998 comenzó a estudiar actuación.

Argos Producciones le dio la oportunidad de participar en 1999 con un personaje de la telenovela La vida en el espejo. Posteriormente realizó una audición para el programa de publicidad internacional Insomnia y se convirtió en la conductora junto a Fernando del Solar.

En 2000, participo en la telenovela El amor no es como lo pintan, en 2001 se une al elenco de la telenovela Como en el cine para en el 2002 concluir con la telenovela Por ti.En 2003, se incorpora al programa Cada Mañana junto con Ana Ma. Alvarado, Claudia Álvarez y mas. En 2004, vuelve al cine con los films Mentira y Bandido.

En el 2005, la actriz también estuvo en el elenco de la telenovela Dos chicos de cuidado donde compartió créditos con Víctor y Raúl ex académicos. Para el 2006, se une con sus compañeros del programa de televisión Venga la Alegría.

Actualmente, se encuentra retirada del medio artístico y viviendo Miami a lado de sus las dos hijas que tuvo con Carlos Flores.Entre sus hobbies está el visitar las playas de Miami, así como practicar el tenis y el futbol americano.

PAOLA TURBAY LESBIANA

Hace ya unas semanitas les traje la super noticias de que en la próxima temporada de The Closer tendríamos rollo lesbicanario porque entraría a la serie un nuevo personaje llamado Mikki Mendoza.

Pues bien la actriz que encarnara este personaje es Paola Turbay ,a la que nuestras compañeras colombianas conocen muy bien por haber sido Miss Colombia en 1991 y porque es una actriz bastante conocida por esos rumbos.

La hermosa Paola Turbay habla de su papel :

Mi departamento es el que tiene que ir a patear puertas y entrar en el edificio con las armas en mano para asegurarse de que no hay peligro. Hacemos todo el trabajo pesado. Ya he tenido que patear puertas, saltar sobre coches, saltar de ventanas, caerme de un coche, y caer con mi arma preparada.

¿Mujer latina armada y en uniforme? . en fin que me muero por ver la serie (que por otro lado me gusta mucho aunque últimamente la había dejado de lado) y que ¡No puedo esperar para leer fanfics de Brenda y Paola!

Eso si, sus nombres no pegan ni con cola, si es que cada vez me lo ponen más duro. LOL, en fin que esperemos que le pongan alguna parejita de vez en cuando porque con Brenda me da a mi que no, que la mujer es muy hetero pero se vale soñar ¿verdad?

Monday, June 22, 2009

Tool Time Tuesday...Oven Rack Gadget

Back to the paint store again for more FREE paint sticks...maybe we should buy some paint at some point. Actually, I did buy paint this time for a project in the kitchen. However, I took 2 sticks for one quart of paint...just don't tell.
space

Have you ever seen these? They are oven rack push pulls. My mom bought this one in a very expensive kitchen shop years ago and I still use it. You can check the Internet here for a look at different ones and check out the prices.
space

Well, who wants to buy one when we can make one for free. I used a black sharpie so you can see the lines, but a pencil is better for the finished product. Just draw a "V" on the top edge and a funny looking number 7 on the left hand side.


I took a picture of a tin snip cutter and a little saw, but I found that the snips caused the soft Balsa wood to snap. (Make sure you have extra sticks) The little saw worked better. Having your husband, boyfriend or significant other cut it for you is even better. The wood is soft, so it's not too difficult.
space

sand the edges down to remove the pencil marks.
space

Mark a little dot on the other end of the handle.


With a small drill bit, drill the hole for a ribbon so you can hang it up.


You can skip this step if you aren't going to hang it up.


See...now you can pull out the oven rack with the number 7 notch, and


you can push it back in with the "V" notch. My dad lives with us and has his own kitchen. I used his oven to take these pictures. Yikes, my ovens were not blog worthy. I have apple pie spillage all over the bottom of mine. See, now I know we're close friends, because I just confessed that!!


This is my first TTT with a disclaimer. I know this is obvious, but be careful with the wood near the heating element. The last 2 pictures look like the wood is near the heating element, but it was far away, 3 levels up. They work great just for the racks.
space
I hope you liked the week's TTT. It's not quilty, but eating is my second favorite hobby!!!
space
Have a great Tuesday,
~Karen~

Guess What...

I SEWED...I SEWED...I SEWED!!!
space
I had some 30's repro fabric that was already cut into 2 1/2" x 6 1/2" rectangles left over from another project. I used the rectangle for the center and cut some remaining strips into 2 1/2" square and sewed them onto white rectangles. Here are just a few of the Spool blocks that I've made.


close up of some of the fabric.


aren't those kitties cute?!
space

this one is a Michael Miller fabric...love the circles.


space
this is a close up of the step that I always do if I'm sewing a snowball block, flying geese or corner squares like this one. I sew the square on the diagonal from corner to corner. Then I sew again 1/2" away from the original seam. That blue tape peeking out of the bottom of my fabric is my permanent guide. (the yellow was for something else, but I can't remember)
space

cut between each stitching line and you will have a bucket of half square triangle waiting to be squared up.


These will square up at 1 1/2". Great for pinwheels or for the border. Maybe just a little mini!!


Here is the pile of the 3 pieces for each block just waiting to be sewn together.


I'll show more when I get the rest done and square up the half square triangles.
space
Quick question: do you like the setting in the first picture with alternating spools or the second picture with the spools all standing up?? (oops, now you have to scroll back up...sorry)
space
See you in a few hours for TTT,
~Karen~